how to make a design in cake batter
get fresh recipes via email:
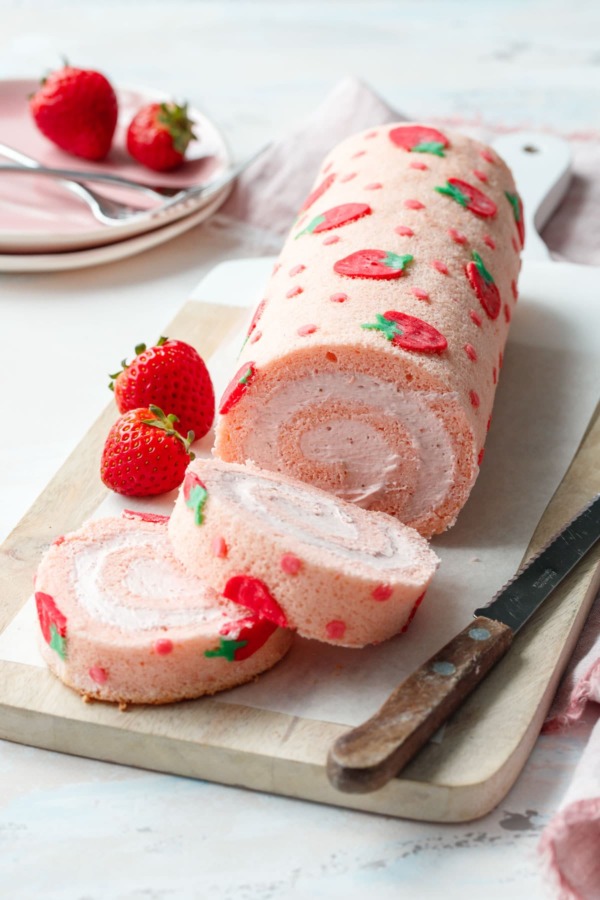
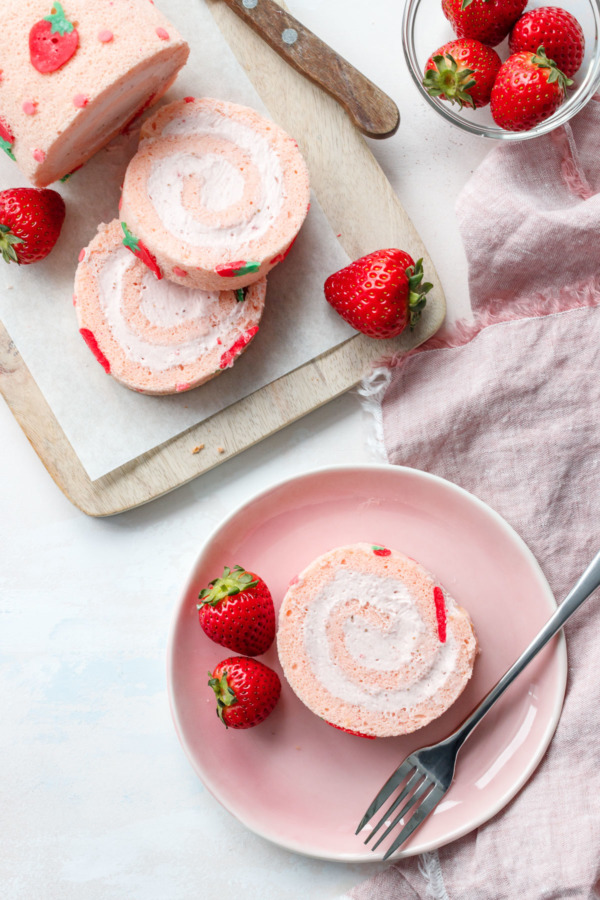
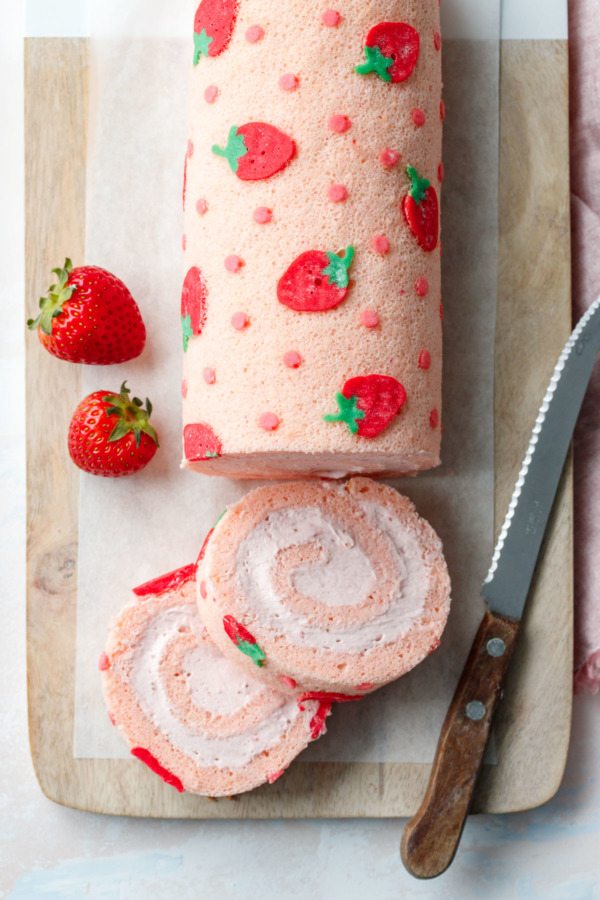
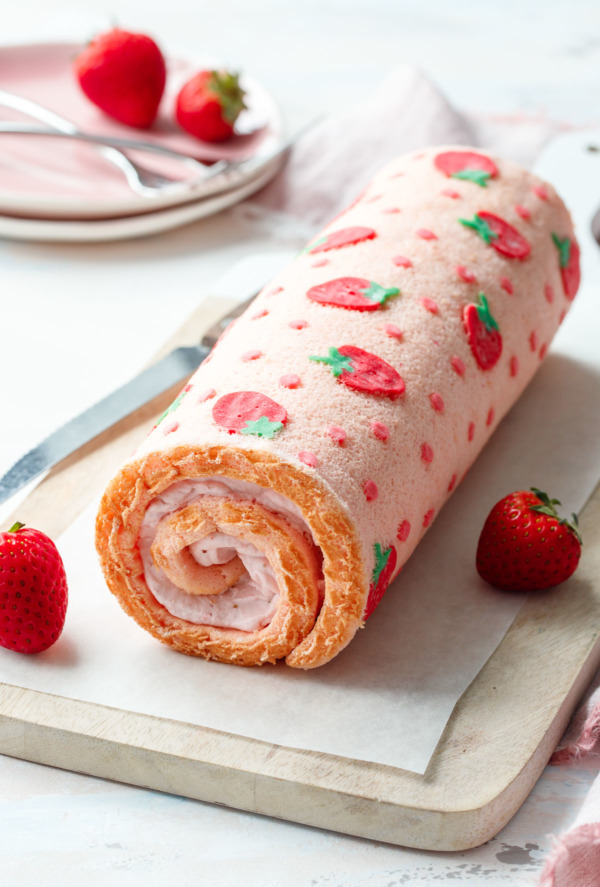
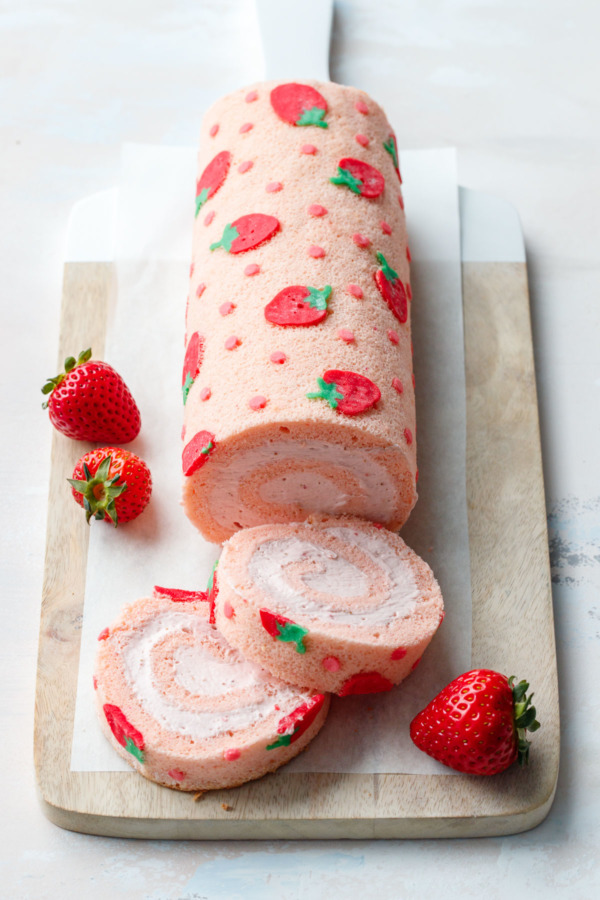
Roll into strawberry season with this gorgeous strawberry cake roll: a delicate almond sponge cake decorated with a cute strawberry design and filled with strawberry whipped cream.
The Japanese are really on to something with these patterned cake rolls. They are as impressive to behold as they are delicious to eat, and are arguably much easier and less time-intensive than fancy frosted layer cakes.
Talk about dressed to impress!
If you're the type that wants to create beautifully decorated cakes that'll wow your guests, but don't want to deal with a laborious layer cake, you should definitely give a Japanese-style patterned cake roll a try.
This stunning style of cake allows you to create intricate designs that are baked right into the cake itself, no fancy frosting necessary.
The technique does require some basic piping skills (the more you practice the better you'll get), but honestly, even if you just piped a bunch of polka dots all over the thing, the result would be absolutely lovely.
Unlike my pumpkin roll cake which divides the main sponge batter into three separate colors, this method uses a separate paste-like batter that can create a more detailed design.
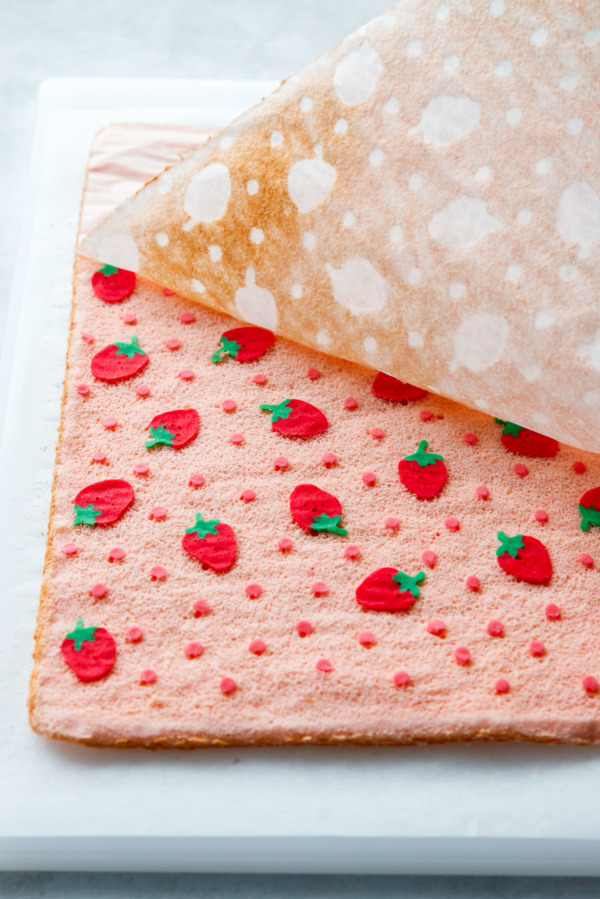
The paste is piped onto a sheet of parchment, freezing briefly to set, then an airy sponge cake batter is poured over the top. After baking, peel back the parchment paper and prepare to be wowed!
I originally went for a more abstract strawberry design, with a pink background, green squiggles and yellow seeds. It came out quite cute, but looked more like an Easter egg than a strawberry. And unfortunately, I failed big time when it came to the filling on that first roll, attempting a strawberry marshmallow filling that, while it tasted amazing, oozed out of the ends of the roll like sweet, sticky magma.
Take 2.
Since I had to remake the cake anyway to fix the filling, I also reworked the design, opting for dots instead of squiggles (easer to pipe), and simplified red berries so there would be no mistaking the flavor of this cake roll.
The cake batter paste gives the pattern an almost embossed feeling, the paste cooking up slightly firmer than the surrounding sponge. It's a cool effect, although it is a bit tricky to cut since the paste bakes up firmer than the sponge cake itself (tip: use a serrated knife to very gently saw through the bigger shapes). Or, plan a design that allows you to cut in between the piped shapes.
The little bubbles that appeared in the berries were a complete accident, but don't they look like little seeds?
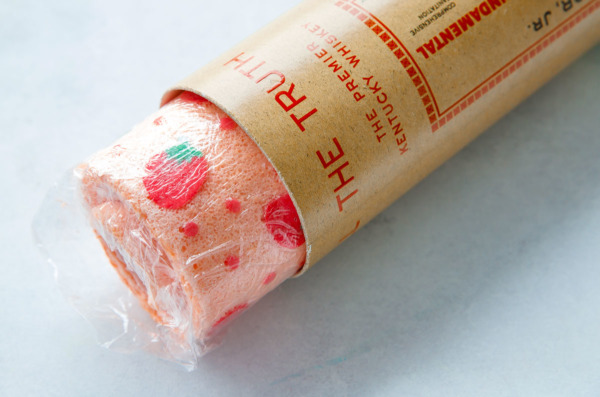
Pro Tip: To keep your cake roll from slumping into an oval, chill it in a large cardboard mailing tube (about 3.25″ in diameter). I used a cardboard tube that a whiskey bottle came in and it couldn't have been more perfect.

This same technique could be used to create just about any design your heart desires!
Whatever design you go with, I recommend creating a template or drawing the design on the back of your parchment before you start piping. I know I personally have trouble controlling the piping tip (my hands just don't have that kind of strength), so not having to think about the design as you go is immensely helpful.
I've created a printable template with my design (scroll down below the recipe to get it). Just print the template onto a sheet of letter sized paper, and place it under your parchment paper to help you pipe the precise design. Just don't forget to remove the paper before baking!
Since piping a design like this is somewhat tedious, you can save yourself some effort and only put the design on the outer 2/3 of the cake. The rest will be rolled up inside the final cake roll, after all, so only the part of the cake will actually be visible on the outside of the roll. (If you do this, just be sure that when you roll up your cake, you start with the blank side, otherwise your beautiful design will end up on the inside of the roll where no one can see it.)
UPDATE 8/31/30: After testing this recipe numerous times I've adjusted the design paste recipe. The original paste was a thick batter, and while it held detail nicely, it was rather tough to pipe, and thinning it out made it harder to get a detailed design. The new and improved design paste uses softened butter rather than vegetable oil, making for a more butter-cream like consistency that's quite easy to pipe with a piping bag. It'd also work really well with cake stencils!
The updated design paste blends better with the cake, so the design won't be quite as 'raised' looking as the photos. It's also softer, and easier to cut than the old version.
For reference, if you've made this recipe previously and want to replicate it, the original design paste called for 1 large egg white (30g), 2 tablespoons (16g) powdered sugar, 1/2 cup (50g) cake flour, 1 tablespoon (15g) vegetable oil, and 1-2 teaspoons milk as needed. The updated recipe is shown below.
Spring Strawberry Cake Roll
Prep Time: 2 hours
Cook Time: 10 minutes
Total Time: 12 hours
A Japanese-inspired patterned roll cake perfect for spring, filled with a fluffy strawberry whipped cream.

Ingredients:
For Paste:
- 2 tablespoons (30g) unsalted butter, softened (softer than room temp, but not melted)
- 2 1/2 tablespoons (30g) granulated sugar
- 1/3 cup (40g) cake flour, sifted
- 1 large egg white (30g)
- food coloring
For Cake:
- 3 large eggs, separated
- 1/4 cup plus 2 tablespoons (75g) granulated sugar, divided
- 1 tablespoon vegetable oil
- 1 1/2 tablespoons (23g) whole milk
- 1/2 teaspoon almond extract
- 1/2 teaspoon kosher salt
- 2/3 cup (67g) cake flour, sifted
- food coloring
For Filling:
- 1 cup (240g) heavy whipping cream
- 1/4 teaspoon unflavored powdered gelatin
- 1/2 ounce (14g) freeze-dried strawberries
- 3 tablespoons (38g) granulated sugar
- 1 tablespoon (8g) powdered sugar
Directions:
- Preheat oven to 350 degrees F. Lightly butter or grease the bottom and sides of a 15 by 10-inch jelly roll pan; line with parchment paper (if using a design template, place the printed template underneath the parchment paper, or trace it onto the back side of the parchment with thick pencil lines).
- To make design paste, with a spatula or wooden spoon, mix butter and sugar together until you get a smooth paste. Add flour and mix until partially incorporated, then add egg white and mix until smooth. Paste should have a buttercream-like consistency.
- Divide paste into 3 bowls (how you divide it proportionally will depend on your design) and add food coloring as desired. (I mixed 20g paste with 1 drop leaf green; 60g paste with 1 drop deep pink and 1/2 drop red; and 40g paste mixed with 1 teaspoon of the pink paste to produce a lighter shade of pink for the dots).
- Transfer pastes into piping bags fitted with small round piping tips (I used my smallest #1 tip for the green, a #3 tip for the light pink dots, and a larger #5 tip for the berries).
- Pipe design onto parchment. Start with the green, then pipe the darker pink berries on top, and finish with the lighter pink dots. Place pan in freezer to allow the design to set while you prepare the rest of the batter.
- Place egg yolks in a mixing bowl. Add 1/4 cup sugar and whisk until sugar is dissolved and yolks are lightened in color. Drizzle in vegetable oil, whisking constantly, until incorporated. Whisk in milk, almond extract and salt. Add food coloring as desired (I mixed a bit of Deep Pink and Red with a toothpick, then added just a toothpick's worth to the batter.)
- Sprinkle sifted cake flour over batter and fold until incorporated.
- In a clean mixing bowl or the bowl of a stand mixer fitted with the whisk attachment, beat egg whites until frothy. Add remaining 2 tablespoons of sugar and beat on high speed until whites hold medium-stiff peaks.
- Fold a third of egg whites into batter to lighten it, then add the remaining egg whites and fold until just incorporated.
- Pour batter over top of frozen design, spreading the batter into an even layer using a large offset spatula. Bang the pan a few times on the countertop to remove any air bubbles and level out the top.
- Bake for about 10 minutes or until top is springy and edges are just barely starting to brown.
- Remove from oven. Carefully invert warm cake onto a piece of parchment backed by a solid surface like a large cutting board. Peel off parchment paper backing, revealing the design. Liberally dust a clean tea towel with powdered sugar and lay on top of cake. Flip cake over so the design is facing down.
- Starting with the side of the cake without the design, carefully roll up the warm cake in the towel. Doing this while the cake is still warm will give the cake a 'muscle memory' and allow you to roll it up later with the filling without it cracking.
- Let rolled cake cool for about 1 hour or until completely cool to the touch.
- Meanwhile, to make filling, in a small bowl, sprinkle gelatin over 1 tablespoon cool water and let soften for 5 minutes. Microwave the mixture in short, 5 second increments until the gelatin is completely dissolved and liquefied. Let cool slightly (but don't let it firm up, if it does, microwave it again).
- In a food processor or clean coffee/spice grinder, pulse freeze dried strawberries together with sugar until very finely ground.
- Place whipping cream in the bowl of a stand mixer fitted with the whisk attachment. Beat on medium speed until frothy, then add powdered sugar, increase to medium high and beat until the paddle starts to leave trails in the cream.
- Mix a spoonful of the partially-whipped cream into the bowl with the melted gelatin until completely incorporated, then, with the mixer running on low, add this back to the bowl with the rest of the cream. Add strawberry sugar mixture and increase speed to medium high, beating until cream holds medium-stiff peaks (take care not to overbeat).
- Carefully unroll cake and remove towel. You may need to hold it with your hand as it will try to roll back up (see, muscle memory!) Spread filling into a thin even layer over the whole cake, leaving about 1/2 inch bare at the far end. You may not need all of the filling, depending on how thick a layer you want.
- Gently roll up the cake, taking care not to use too much pressure lest the filling squeeze out the sides. Wrap tightly in plastic wrap and refrigerate for at least 2 hours or overnight, until filling is set. If you happen to have a cardboard tube lying around, place your cake roll in the tube to keep the bottom from flattening out as it chills (I used a 3 1/2-inch-diameter tube for a whiskey bottle and it was the perfect size).
- To serve, cut into slices with a sharp serrated knife (the design bits are harder than the cake itself. The slices will look best if you cut using a sharp serrated knife, pulling the knife gently towards you, letting the weight of the knife do the cutting; it may take a few strokes to get through the firmer design parts. Try not to saw back and forth or press down or the design will compress into the cake).
- Cake roll will keep, tightly wrapped and refrigerated, for up to 3 days.
All images and text © Lindsay Landis /
Did you make this recipe?
Let us know what you think!
Leave a Comment below or share a photo and tag me on Instagram with the hashtag #loveandoliveoil.
Printable Template
If you want to replicate my design exactly, download the printable PDF template below. Letter-size paper is a bit smaller than a standard jelly roll pan, so you can either print multiple pages to fill the pan, or move the paper around underneath the parchment as you go along.
Happy baking!
Download this FREE Printable!
Enter your email address below to instantly download this FREE template!
There may be affiliate links in this post. We are a participant in the Amazon Services LLC Associates Program, an affiliate advertising program designed to provide a means for us to earn fees by linking to Amazon.com and affiliated sites.
how to make a design in cake batter
Source: https://www.loveandoliveoil.com/2019/05/strawberry-cake-roll.html